
Migachat
Migachat User Manual
The Migachat module is a versatile AI assistant and integration tool designed to empower businesses to handle user interactions through AI. It serves various use cases, including chatbot development, AI-driven customer support, educational platforms, and more.
SETTINGS
Please refer to the documentation for detailed API configuration: Link to Documentation.
Backoffice settings
Duration to maintain the history of chats
- Here you can set the duration to maintain the history of chats. The chat history older than the duration will be deleted automatically.

OpenAI models tokens limit
- The OpenAI chat model’s token max limit is configured here. It is useful if in the future there are new models or changes in the limit of existing models.

MODULE CONFIGURATION
ChatGPT API Setup
- In the Module Operation, select the ChatGPT API.
- Add Organization ID: Obtain this from Organization Settings.
- Add Secret Key: Retrieve this from API Keys.
Simple Chat(completions API)
- Chat Type: Use OpenAI chatGPT completions API.
- History Tokens %: The tokens reserved for the history of messages are to be attached with API calls to preserve the context of the chat.
- Max messages in history: no of messages to include in history.
- System prompt tokens %: Token reserved for system prompt to be attached to the API call.

Assistant and Threads
- Chat Type: Utilize OpenAI’s ChatGPT Assistant and Threads API.
Note: Threads will be automatically created and managed based on the unique chat ID.
- After saving the form, the system will verify the entered credentials. Incorrect credentials will prevent saving.
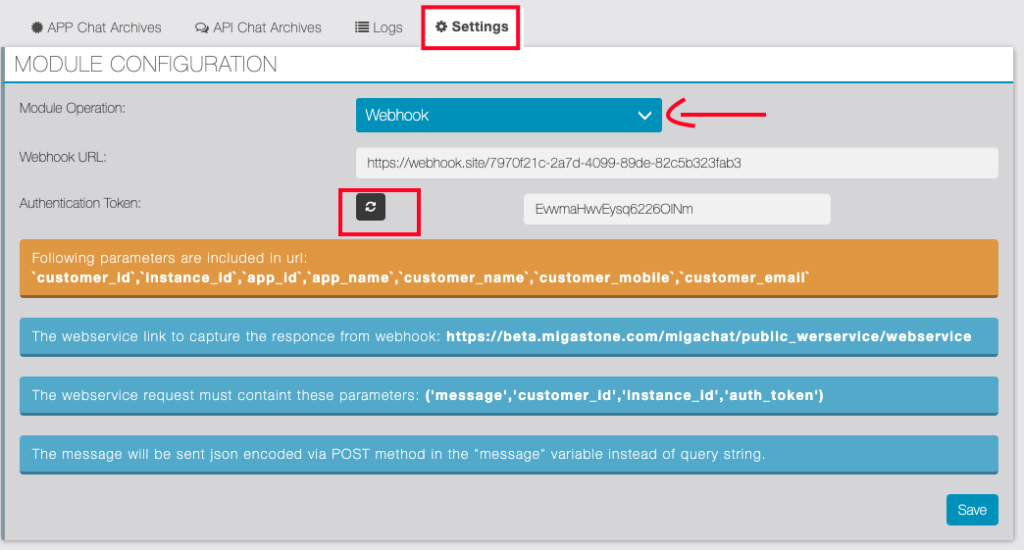
Webhook & Web-Service Setup
- In the Module Operation, select the Webhook.
- Add a valid Webhook URL.
- Use the provided Auth Token in the web service request, which can be regenerated anytime.
OpenAI Configuration (Only Available if ChatGPT API and simple Chat type is selected)
- After setting up the module configuration, specify the AI model for your chatbot.
- Select Model: Choose the OpenAI ChatGPT Model.

System Prompt for OpenAI ChatGPT Configuration (Only Available if ChatGPT API and simple Chat type is selected)
- Manage the system prompt by enabling or disabling it.
- Add the system prompt text.

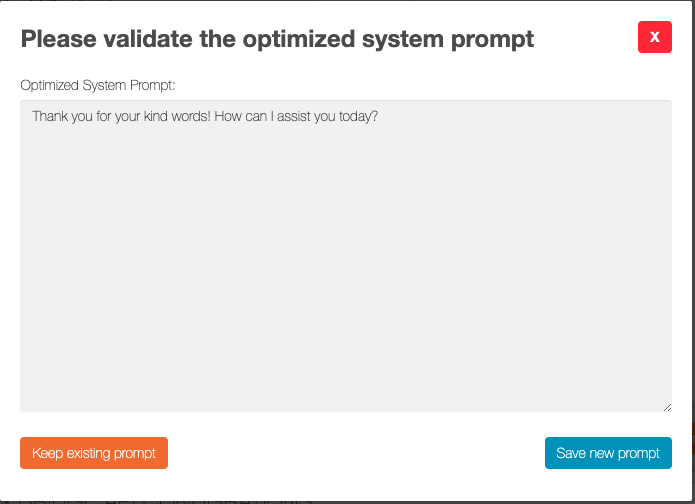
- You can optimize the System prompt by clicking the “Optimize system prompt”.
- The ChatGPT API will optimize this.
- A popup model is displayed. Here you can keep the existing system prompt or save the new optimized system prompt
- You can translate the System prompt by clicking the “Translate the system prompt into English”.
- A popup model is displayed. Here you can keep the existing system prompt or save the new translated system prompt.
- Last saved tokens: The count of tokens after saving the system prompt is displayed plus the token reserved for the system prompt according to the set percentage and the Model’s total tokens.
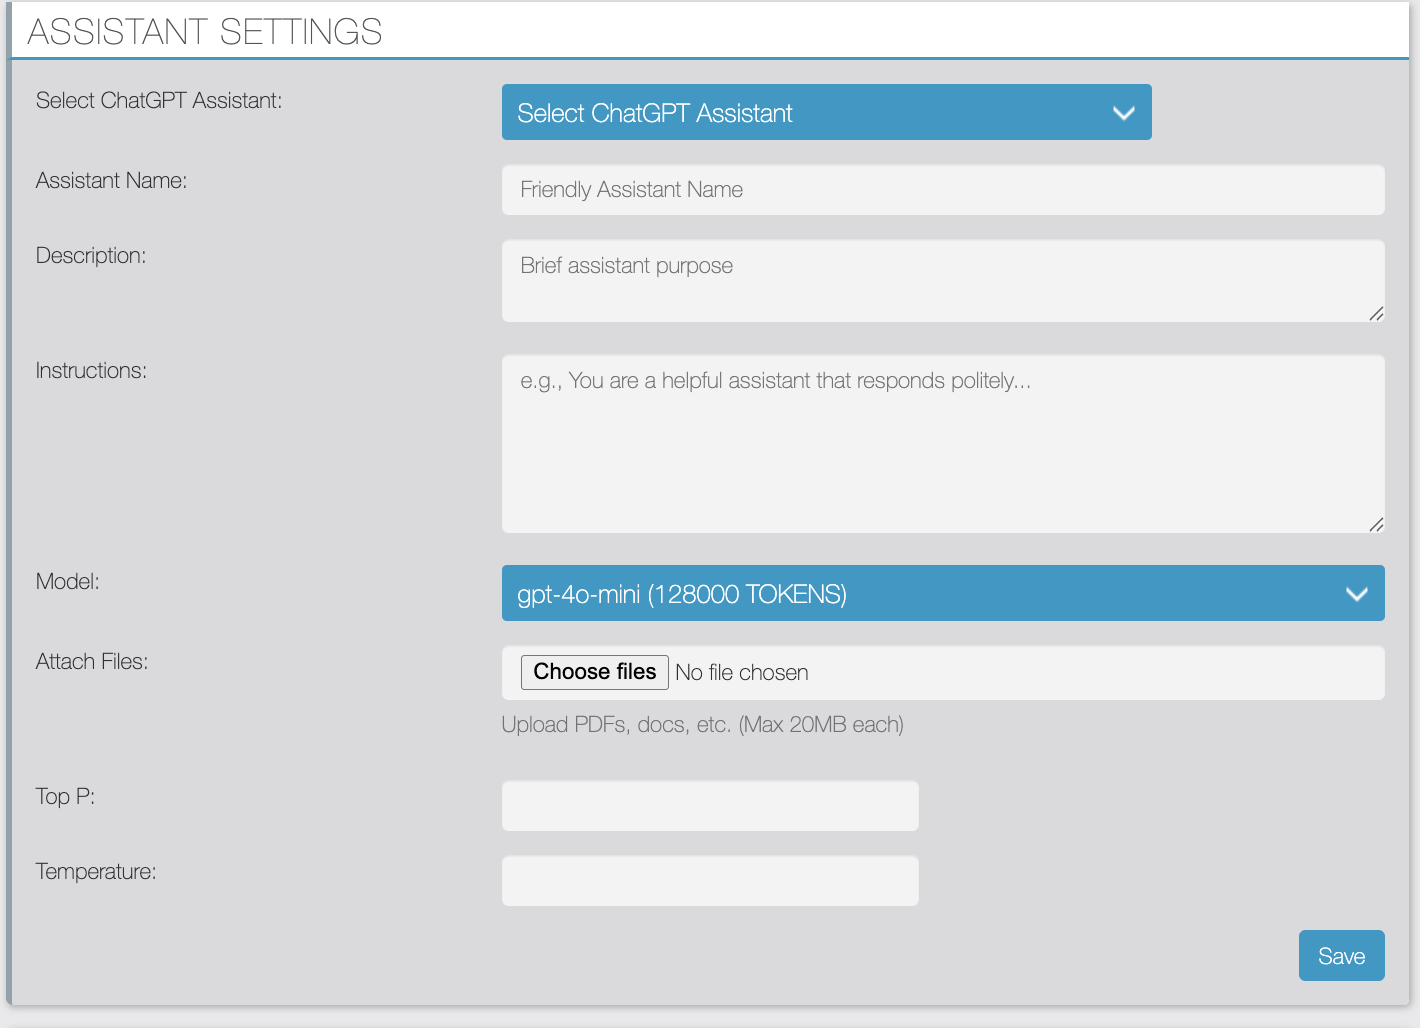
Assistant settings for OpenAI ChatGPT Configuration (Only Available if ChatGPT API and Assistant type are selected)
- Select ChatGPT Assistant: Create new or update an existing assistant.
- Assistant Name: Assistant display name.
- Description: Assistant description. (only for own understanding)
- Instructions: Same as System Prompt. Knowledge base for the Assistant.
- Model: The OpenAI base model to be used for the assistant.
- Attach Files: Knowledge base file for the Assistant.
- Top P: between 0-1. For more details, see the OpenAI documentation.
- Temperature: between 0-1. For more details, see the OpenAI documentation.

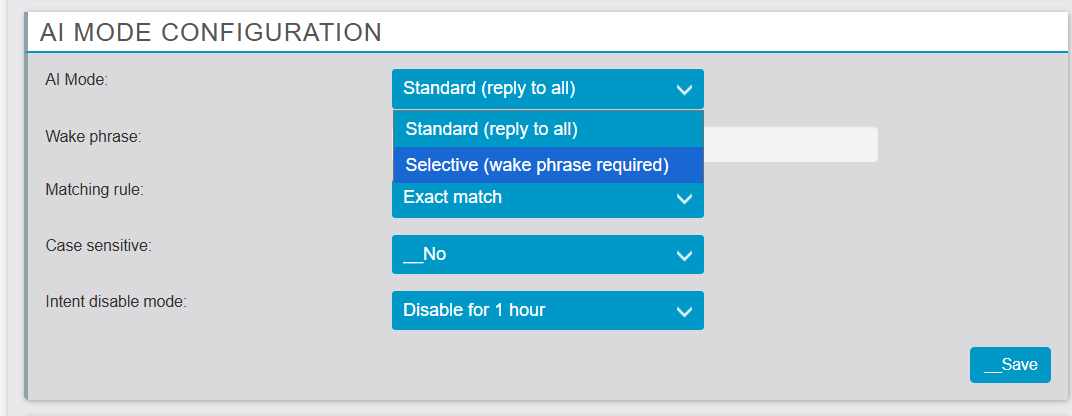
- A selective AI phrase where you can set the Phrase to connect with a human operator. The chat will stop connecting with the operator.
Temporary / Permanent Blacklist Configuration
- Temporary blacklist duration (in hours): This setting dynamically applies the “Temporary Blacklist Duration” (in hours) when manually blocking a Bridge API user through the UI.
- Permanent blacklisted mobile numbers: Add comma-separated mobile numbers to be permanently blacklisted from Bridge API.

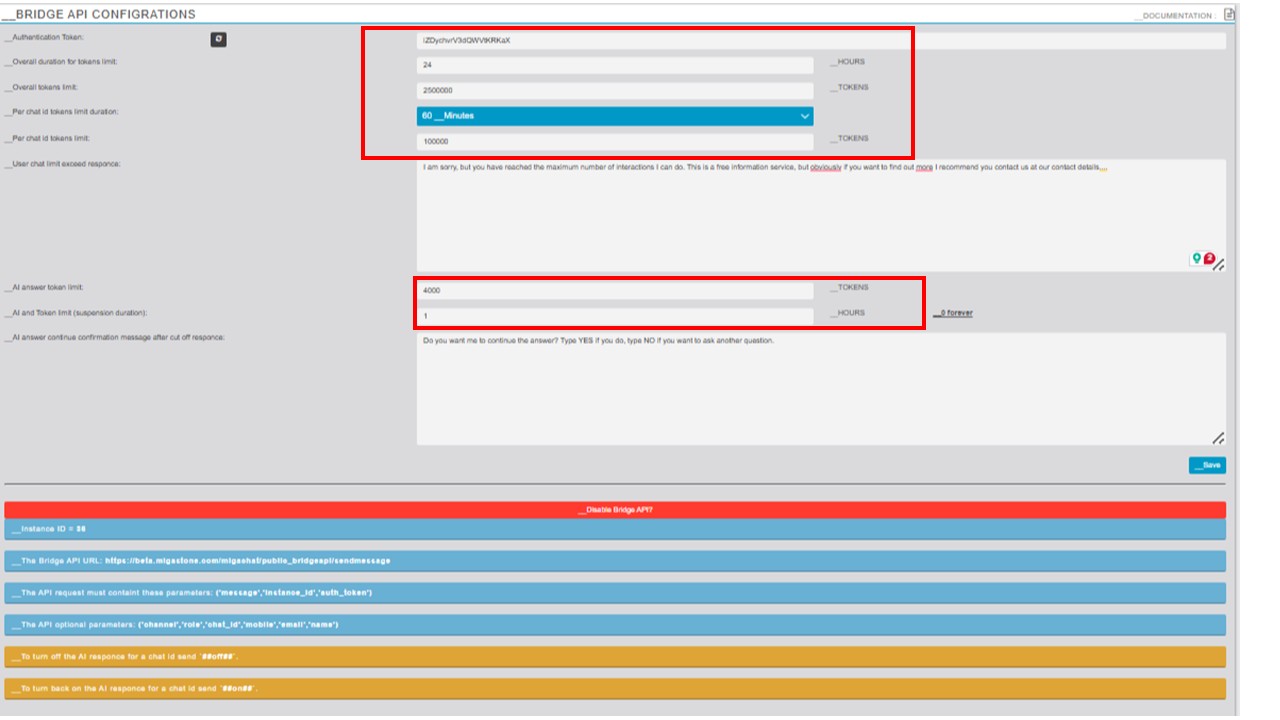
Bridge API Configurations (API for 3rd Parties)
- Configure security settings, including an authentication token and token limits for interactions.
- Authentication Token: An API authentication token for request authentication.
- Add Overall Duration for Tokens Limit: Set the duration for the token limit for all the CHAT IDs in an instance (default: 24 hours).
- Add Overall Tokens Limit: Define the token limit for all the CHAT IDs in an instance (default: 2,500,000 Tokens). An email will be sent to the admins of the application if this limit is reached.
- Select the Per Chat ID Tokens Limit Duration: Set the duration for the token limit of a single CHAT ID (default: 60 minutes).
- Add Per Chat ID Tokens Limit: Specify the token limit for a single CHAT ID (default: 100,000 Tokens). An email will be sent to the admins of the application if this limit is reached.
- Add User Chat Limit Exceed Response: Configure the response when a single CHAT ID reaches the token limit, and it will be automatically translated into the language of the previous chat.
- Set the AI Answer Token Limit: Define the token limit for AI responses, which will be the same for all AI models.
- Enable or Disable the Bridge API functionality.
Tokens Limit For fine-tuned Models
- Here you can set the total tokens limit of custom fine-tuned openAi models.

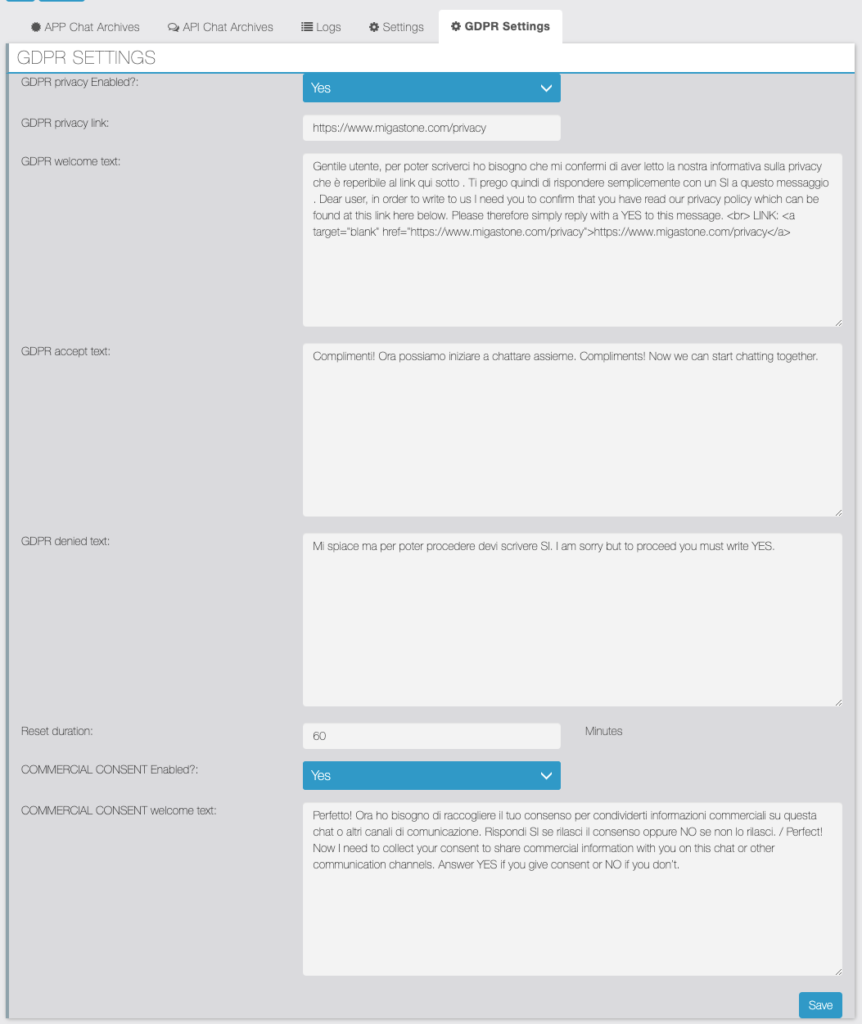
GDPR Settings (only for bridge API)
In this module with GDPR privacy enabled, when a user sends a message via the bridge API, the system prompts the user for GDPR privacy consent. If consent is granted, the system may then ask for commercial consent if that feature is enabled. If a user declines GDPR consent, their data is flagged for deletion after a specified Reset Duration.
In the case of an agent initializing a new chat with a new chat ID, the system does not ask for GDPR consent from the user, and the consent is marked as external. This approach ensures compliance with GDPR principles by obtaining explicit user consent for data processing and respecting user preferences regarding commercial interactions.
- Configure the GDPR settings.
- GDPR privacy Enabled?: To enable or disable the GDPR consent from bridge API users.
- GDPR privacy link: Privacy link to redirect the user if the user wants to read the privacy statement.
- GDPR welcome text: Text to send the user for the first time to collect the GDPR consent.
- GDPR accepts text: Text to be sent when the user accepts the GDPR Privacy consent.
- GDPR denied text: Text to be sent when the user denies the GDPR Privacy consent.
- Reset duration: Time in minutes to remove the user’s personal information and ask for the GDPR consent again.
- COMMERCIAL CONSENT Enabled?: To enable/disable the COMMERCIAL consent from bridge API users.
- COMMERCIAL welcome text: Text to send the user for the first time to collect the COMMERCIAL consent.
GDPR LOGS
- You can check the GDPR consent USERS.
- You can Force the Privacy consent for All CHAT IDS

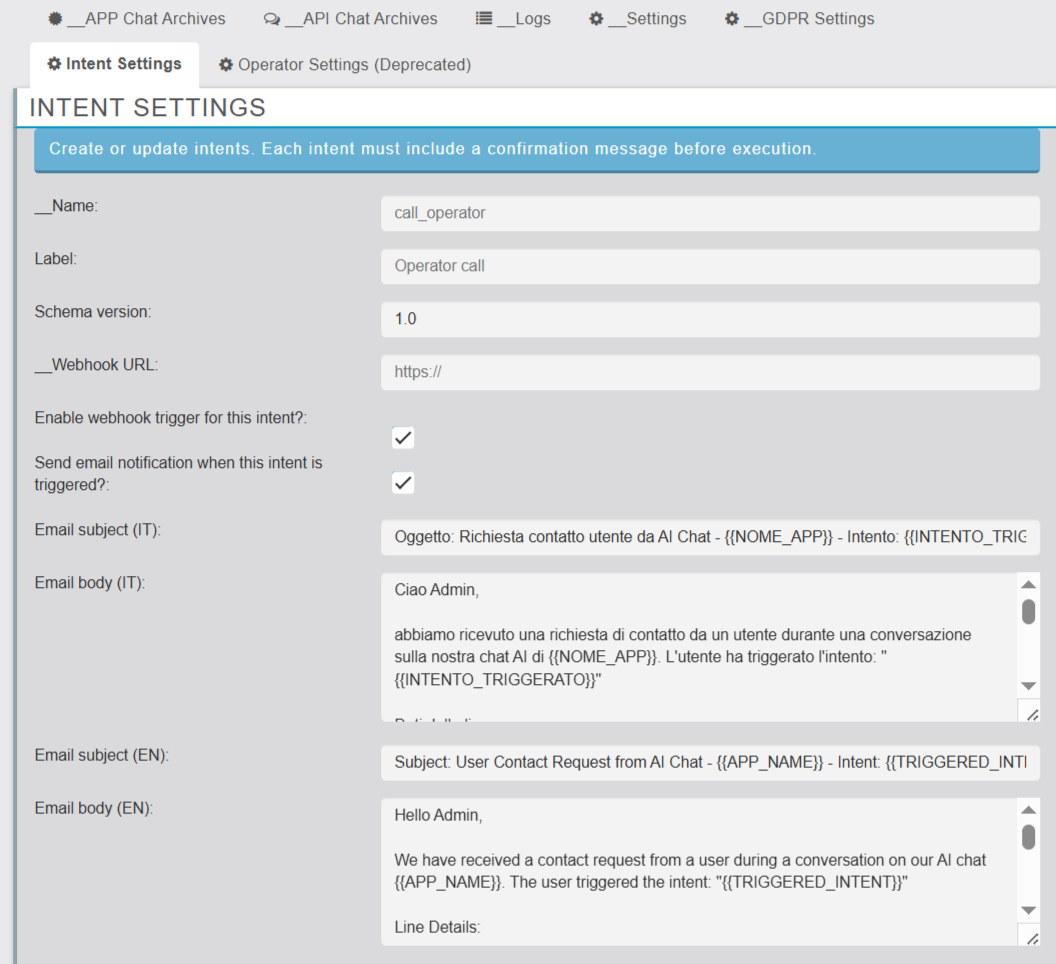
Intent settings
Intent Management in MAB (Migachat Application Builder) allows administrators to create and manage user intents that trigger predefined actions such as webhooks, email notifications, or operator handover flows during an AI chat conversation.
Function
Intent Management enables structured automation and human intervention by defining what happens when a user confirms a specific intent.
How it works:
Admins create or edit intents from MAB → Migachat → Application → Intent Settings.
Each intent requires a confirmation message that the user must approve before execution.
Once confirmed, the intent can:
Trigger a webhook,
Send email notifications,
Pause the AI for operator handling (optional).
Changes are saved instantly and applied in real time.
Intent Fields Explanation
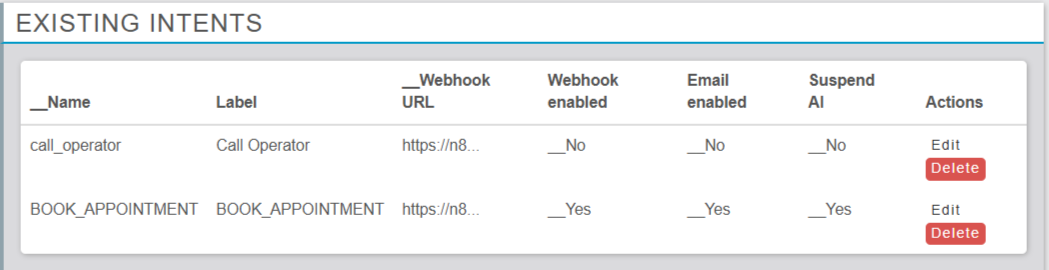
Name: System-level identifier used internally and by integrations (should remain unchanged once live).
Label: Human-readable name shown to administrators in the MAB interface.
Confirmation Message (Required): Message displayed to the user before execution. If declined, no action occurs.
Webhook URL (Optional): Endpoint called after user confirmation (e.g., Make.com, n8n, Laravel).
Email Notification (Optional): Sends an email when the intent is confirmed/executed.

Suspend AI After Execution (Optional):
ON: AI pauses after the intent triggers and waits until resumed manually.
OFF: AI continues automatically after execution.
Assistant Instructions (Optional): Additional AI behavior or context applied while the intent is active.
Metadata (JSON) (Optional): Custom JSON data passed to webhooks or integrations for advanced configuration.

Important Tip:
If Suspend AI After Execution is enabled, the external system or operator must call the Resume AI API to continue the conversation.
AI Resume API (Bridge API)
The AI Resume API is used to reactivate AI assistance in a chat where the AI was paused due to an intent execution with “Suspend AI after execution” enabled.
Function
This API allows external systems or operators to safely return control back to the AI after completing a manual or automated task.
API Request
Endpoint:POST /migachat/public_bridgeapi/resumeai
Request Body (JSON):
Successful Response
Security Note
The auth_token functions like a password and must be stored securely in automation secrets. It should never be exposed in logs or plain text.
Common Usage Scenarios
Call Operator (Suspend AI = ON)
- User confirms the intent
- Webhook is triggered
- AI pauses automatically
- Operator completes the task
- Integration calls
/resumeai - AI conversation resumes
Book Appointment (Suspend AI = OFF)
- User confirms the intent
- Webhook is triggered
- AI continues automatically
- No Resume AI API call required
User Declines Confirmation
- User declines the confirmation message
- Intent is cleared
- No webhook or email is sent
- AI continues normally
Quick Troubleshooting Checks (AI Resume Issues)
- Ensure the auth_token is correct and valid.
- Confirm the correct API endpoint path is being used.
- Verify that instance_id and chat_id belong to the same application and chat session.

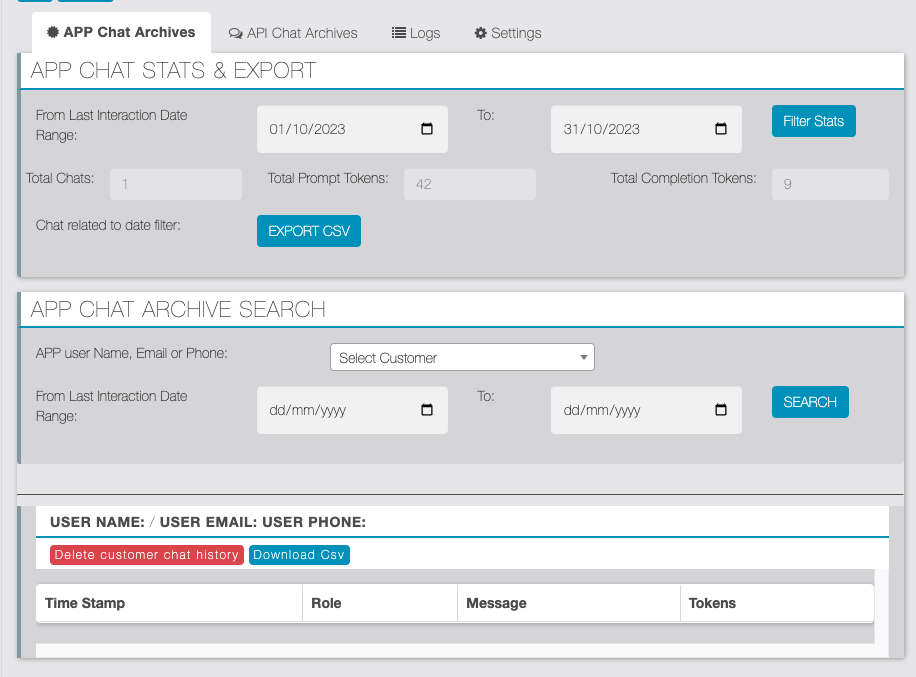
App Chat Archive
In this section, you can access application statistics, view reports, and explore customer chat logs.
- Retrieve application chat stats and download CSV with stats such as Total Active customers, Total prompt tokens, and Total Completion Tokens.
- Export a complete chat of active customers within a specified date range.
- Get customer chat for a given date range, view chat history, and token usage. You can delete the complete chat history for a selected customer and download CSV for the date range and customer.
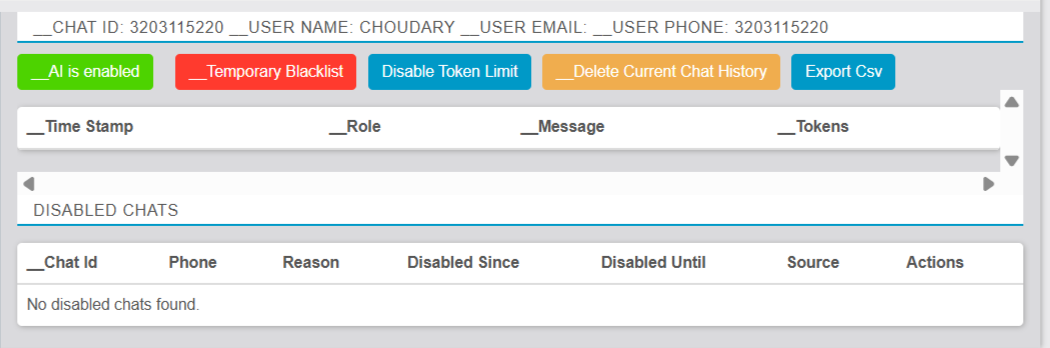
API Chat Archive (BridgeAPI)
In this section, you can access bridge API statistics, view reports, and explore CHAT ID chat logs.
- Import Bridge API chat log via CSV.
- Get BridgeAPI chat stats and download CSV, including Total Active CHAT IDs, Total prompt tokens, and Total Completion Tokens.
- Export complete chat of active CHAT IDs within a specified date range.
- Access customer chat for a given date range, view chat history, and token usage, and delete complete chat history for a selected customer.
- You can delete the complete chat logs of API for an instance of the module by clicking “Delete API chat history”
- You can temporarily blacklist a chat id by clicking “Temporary Blacklist”.
- CSV format to import chat is:


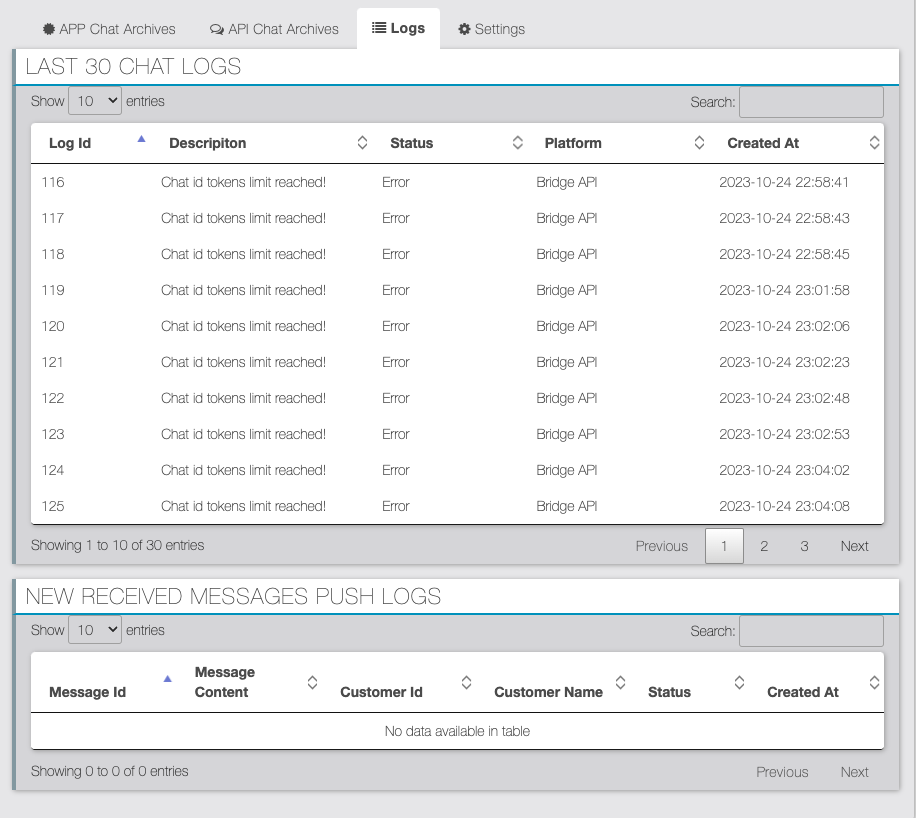
Logs
- The Logs section allows you to view logs for the last 30 chats across the system and see any errors encountered during interactions.
- New received Messages push notification logs.
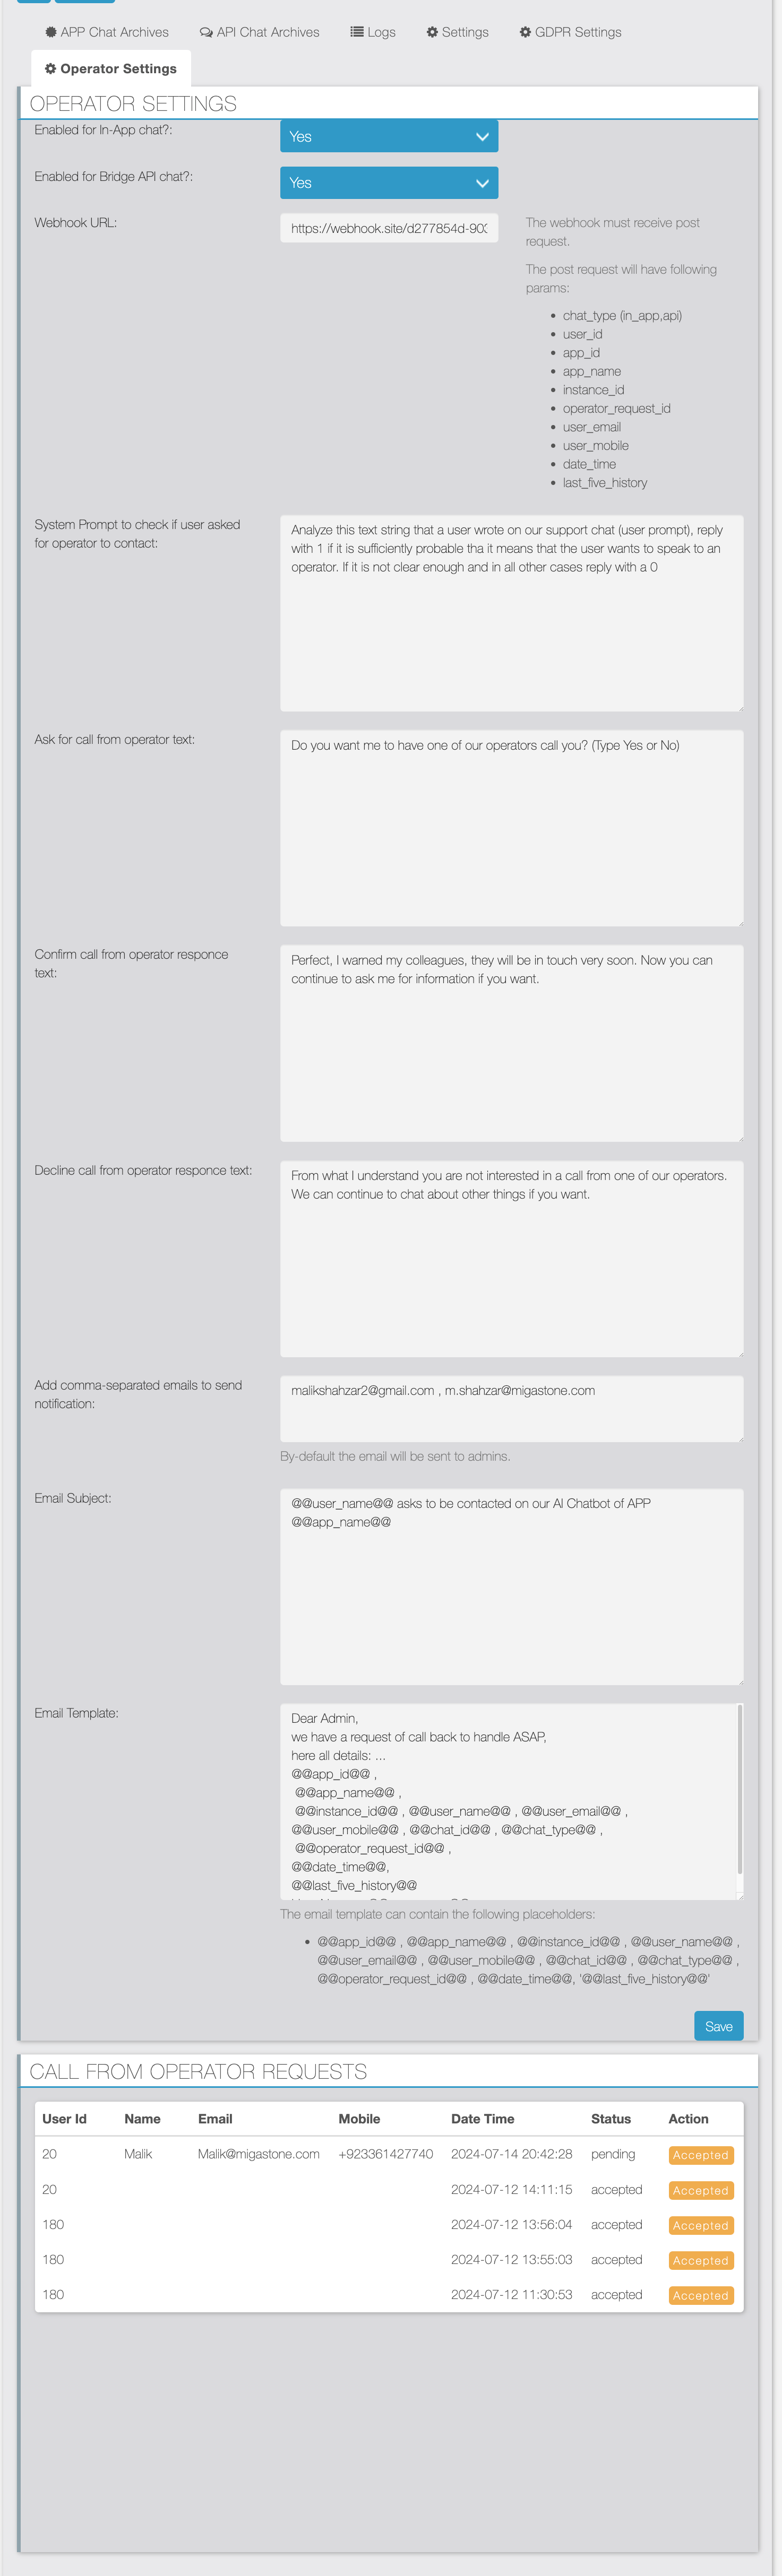
Operator Settings Documentation
Overview
The Operator Settings panel in the Migachat application allows you to configure various settings for operator interactions within the application, including enabling or disabling features for in-app and bridge API chats, setting up webhooks, configuring prompts and responses for user interactions, and managing email notifications.
Settings Form
- In-App Chat
- Label: Enabled for In-App chat?
- Field Type: Dropdown (Yes/No)
- Description: Enable or disable operator settings for in-app chat.
- Bridge API Chat
- Label: Enabled for Bridge API chat?
- Field Type: Dropdown (Yes/No)
- Description: Enable or disable operator settings for bridge API chat.
Webhook URL
- Label: Webhook URL
- Field Type: Text Input
- Description: The URL to which webhook notifications will be sent. This webhook must accept POST requests. The POST request will contain the following parameters:
– `chat_type` (in_app, api)
– `user_id`
– `app_id`
– `app_name`
– `instance_id`
– `operator_request_id`
– `user_email`
– `user_mobile`
– `date_time`
– `last_five_history`
System Prompt
- Label: System Prompt to check if user asked for operator to contact
- Field Type: Textarea
- Description: Custom prompt to analyze user input and determine if they want to speak to an operator. Default prompt: `Analyze this text string that a user wrote on our support chat (user prompt), reply with 1 if it is sufficiently probable that it means that the user wants to speak to an operator. If it is not clear enough and in all other cases reply with a 0.`
Ask for Call from Operator Message
- Label: Ask for call from operator text
- Field Type: Textarea
- Description: Custom message to ask users if they want a call from an operator. Default message: `Do you want me to have one of our operators call you? (Type Yes or No)`
Confirm Call from Operator Message
- Label: Confirm call from operator response text
- Field Type: Textarea
- Description: Custom message to confirm that an operator will contact the user. Default message: `Perfect, I warned my colleagues, they will be in touch very soon. Now you can continue to ask me for information if you want.`
Decline Call from Operator Message
- Label: Decline call from operator response text
- Field Type: Textarea
- Description: Custom message if the user declines a call from an operator. Default message: `From what I understand you are not interested in a call from one of our operators. We can continue to chat about other things if you want.`
Additional Emails
- Label: Add comma-separated emails to send notification
- Field Type: Textarea
- Description: List of additional email addresses to send notifications to. By default, the email will be sent to admins.
Email Subject
- Label: Email Subject
- Field Type: Textarea
- Description: Subject line for notification emails. Default subject: `Customer asked to contact operator.`
Email Template
- Label: Email Template
- Field Type: Textarea
- Description: Template for notification emails. The template can contain the following placeholders:
- – `@@app_id@@`
- – `@@app_name@@`
- – `@@instance_id@@`
- – `@@user_name@@`
- – `@@user_email@@`
- – `@@user_mobile@@`
- – `@@chat_id@@`
- – `@@chat_type@@`
- – `@@operator_request_id@@`
- – `@@date_time@@`
- – `@@last_five_history@@`
Call from Operator Requests
This section displays a table of operator request data, including:
- – User Id
- – Name
- – Mobile
- – Date Time
- – Bot Type
- – Status
- – Action (e.g., accepting a pending request)
Handling User Prompts
- Initial Request: If the Bridge API is enabled and the user hasn’t already asked for an operator, analyze the user prompt using the configured system prompt. If the user likely wants to speak to an operator, set the `asked_for_operator` flag and prompt the user to confirm if they want a call from an operator.
- User Confirmation: If the user has already asked for an operator, analyze the user’s response to confirm if they want a call. If confirmed, save the request, send webhook notifications, and email notifications, then reset the `asked_for_operator` flag and notify the user that an operator will contact them soon. If declined, reset the flag and inform the user that the request was not made.
Application Interface
- The Application interface provides a user-friendly chatbot-like experience that you can access after logging in.
- You can copy the AI response by clicking the clipboard icon.
